
# 一.redux
# 例子
主要目录结构如下:

- 构建
Action- 在根目录下创建一个文件夹 action
- 在该目录下创建一个
index.js文件,用来构建action - 在
action创建函数里面利用return,返回一个action对象,注意需要携带type属性 - 把这个
action创建函数进行导出
action/index.js
const sendAction = () => {
  return {
    type: "send type",
    value: "我是一个action",
  };
};
module.exports = { sendAction };
1
2
3
4
5
6
7
2
3
4
5
6
7
- 构建
Reducer- 在根目录下创建一个文件夹
reducer - 在该目录下创建一个
index.js文件,用来构建reducer,注意reducer要接收两个参数 - 第一个参数是
state,可以定义一个初始化state,然后进行赋值 - 在函数里面判断第二个参数
action的type值是否是我们发送的 - 如果是,可以通过
return返回一个新的state - 把
return导出
- 在根目录下创建一个文件夹
reducer/index.js
const initState = { value: "默认值" };
const reducer = (state = initState, action) => {
  switch (action.type) {
    case "send type":
      return Object.assign({}, state.action);
    default:
      return state;
  }
};
module.exports = { sendAction };
1
2
3
4
5
6
7
8
9
10
2
3
4
5
6
7
8
9
10
- 构建
store- 在根目录下创建一个文件夹
store - 在该目录下创建一个
index.js文件,用来构建store,注意createState函数里面第一个参数里面接收的是reducer - 导出刚刚创建的
reducer,然后设置到函数里面 - createStore 的返回值就是创建好的
store,然后进行导出
- 在根目录下创建一个文件夹
store/index.js 将action与reducer关联
import { createStore } from "../reducer";
import { reducer } from "../reducer";
const store = createStore(reducer);
export default store;
1
2
3
4
2
3
4
- 使用
- 给页面的
button按钮绑定一个点击事件 - 在组件加载完事后通过
store来进行监听的注册,返回值可以用来注销监听 - 在点击事件函数中,通过
store,dispatch来发送一个actionhome/index.js
- 给页面的
import React from "react";
import Store from "../../Store";
import { sendAction } from "../../action";
export default class Home extends React.Components {
  handleClick = () => {
    const action = sendAction();
    store.dispatch(action);
  };
  componentDidMoount() {
    store.subscrible(() => {
      console.log("subscrible", store.getState());
      this.setState({}); //以为不需要set什么数据,写{},实质上是调用render
    });
  }
  render() {
    return (
      <>
        <button onClick={this.handleClick}>点我发送一个action</button>
        <div>{store.getState().value}</div>
      </>
    );
  }
}
1
2
3
4
5
6
7
8
9
10
11
12
13
14
15
16
17
18
19
20
21
22
23
2
3
4
5
6
7
8
9
10
11
12
13
14
15
16
17
18
19
20
21
22
23
# 二.React-redux
# 简单例子讲解
- 关于 redux

用途:给整个程序提供数据存储中心;同级兄弟组件之间进行通信
场景一:组件想获取数据,可直接向 Redux 订阅请求,Redux 将查找到数据返回给组件
场景二:数据变动操作,想添加post数据到页面中,保存在数据中心的 Redux 就要发生变化,不能直接通过组件进行添加操作;需要调度 action,在 action 中描述这个动作,顺序:组件要执行数据更新操作->去调 action,action 描述具体执行的动作,确定执行的动作->Reducer 最终执行变动操作的功能,直接作用于 redux,更新数据
- 代码
编辑工具:codeopen (opens new window),注意运行前要先调整为
Babel,引入redux,可在cdnjs (opens new window),找最新的redux 库 (opens new window),以下代码可直接复制粘贴在codeopene中使用
const { createStore } = Redux;
// 3. 初始化state
const initState = {
  todos: [],
  posts: [],
};
// 2.创建reducer函数
function myreducer(state = initState, action) {
  if (action.type == "ADD_POST") {
    //reducer 函数返回一个新的状态,而不是作用于当前的 state 去直接更新,所以用...state浅拷贝原来的初始数据,得到相应的属性
    return {
      ...state,
      posts: [...state.posts, action.post],
    };
  }
  if (action.type == "ADD_TODO") {
    return {
      ...state,
      todos: [...state.todos, action.todo],
    };
  }
}
// 1.创建store
const store = createStore(myreducer);
store.subscribe(() => {
  console.log("state已经更新");
  console.log(store.getState());
});

/*
    以下操作行4 5进行合并
    // 4 action js 对象
    const postAction={
        type:'ADD_POST'
        post:'我的第一篇博客文章'
    }
    // 5 分派action
    store.dispatch(postAction)
*/

store.dispatch({ type: "ADD_TODO", todo: "打扫卫生" });
store.dispatch({ type: "ADD_TODO", todo: "看书" });
store.dispatch({ type: "ADD_POST", post: "我的第二篇博客文章" });
/* 结果:
"state已经更新"
{
  "todos": [
    "打扫卫生"
  ],
  "posts": []
}
"state已经更新"
{
  "todos": [
    "打扫卫生",
    "看书"
  ],
  "posts": []
}
"state已经更新"
{
  "todos": [
    "打扫卫生",
    "看书"
  ],
  "posts": [
    "我的第二篇博客文章"
  ]
}
*/
1
2
3
4
5
6
7
8
9
10
11
12
13
14
15
16
17
18
19
20
21
22
23
24
25
26
27
28
29
30
31
32
33
34
35
36
37
38
39
40
41
42
43
44
45
46
47
48
49
50
51
52
53
54
55
56
57
58
59
60
61
62
63
64
65
66
67
68
69
70
2
3
4
5
6
7
8
9
10
11
12
13
14
15
16
17
18
19
20
21
22
23
24
25
26
27
28
29
30
31
32
33
34
35
36
37
38
39
40
41
42
43
44
45
46
47
48
49
50
51
52
53
54
55
56
57
58
59
60
61
62
63
64
65
66
67
68
69
70
- 关于两个参数:
- 第一个参数,是获取 redux 中 store 的数据,通过 connect 传给组件
- 第二个参数,是将组件的数据发生改变,要将组件的数据传给 store
# 使用 create-react-app 创建的例子
主要目录结构

- 安装相关依赖
yarn add redux
yarn add react-redux
1
2 - 构建
store和reducer- 创建
reducer/index.js文件,构建reducer来响应actions - 创建
store/index.js文件,通过createStore方法,把reducer传进来 - 在
app.js中引入store
- 创建
reducer/index.js
// reducer/index.js
const initState = { count: 0 };
exports.reducer = (state = initState, action) => {
  //判断发送过来的action是不是需要的,如果是,返回新的state
  console.log("reducer", action);
  switch (action.type) {
    case "add_action": //④判断
      return {
        count: state.count + 1,
      };
    default:
      return state; //⑤返回值
  }
};
1
2
3
4
5
6
7
8
9
10
11
12
13
14
2
3
4
5
6
7
8
9
10
11
12
13
14
store/index.js
//  store/index.js
import { createStore } from "../reducer";
import { reducer } from "../reducer";
const store = createStore(reducer);
export default createStore(reducer);
1
2
3
4
5
2
3
4
5
- 构建页面结构
- 创建一个组件,叫
ComA,里面放button按钮 - 创建另外一个组件,叫
ComB,里面放div - 在
app.js中引入两个组件
- 创建一个组件,叫
Provider组件实现- 导入
Provider组件 - 需要利用
Provider组件对整个结构进行包裹 - 给 P
rovider组件设置state属性,而这个值就是通过createStore构建出来的store实例对象
- 导入
App.js
import React from 'react'
import './App.css'
import store from './store'
import {Provider} from 'react-redux'
import ComA from './pages/ComA'
import ComB from './pages/ComB'
function App(){
   return (
       <Provider store={store}>
           <div className="App">
               <ComA>
               <ComB>
           </div>
       </Provider>
   )
}
export default App
1
2
3
4
5
6
7
8
9
10
11
12
13
14
15
16
17
2
3
4
5
6
7
8
9
10
11
12
13
14
15
16
17
ComA发送action- 导入
connect - 利用
connect对组件进行加强,connect(要接受数组的函数,要发送action的函数)(放入要加强的组件) - 需要实现
connect的第二个参数 - 构建一个函数
mapDispatchToProps(dispatch) - 在这个函数里就可以返回一个对象
key方法名value调用dispatch发送action - 在组件的内容可通过
this.pros来拿到这个方法
- 导入
ComA/index.js
import {React} from 'react'
import {connect} from 'react-redux'
class ComA extends React.Component{
   handleClick()=>{
       console.log("comA",this.props)
       this.props.sendAction()//②发送action ③action到reducer里去
   }
   render(){
       return <button onClick={this.handleClick}>+</button> //①点击
   }
}
const mapDispatchToProps=dispatch=>{ //这个函数要有一个返回值,返回值是一个对象
   return {
       sendAction:()=>{//利用dispatch发送一个action
           dispatch({//利用action对象,定义一个type属性
               type:"add_action"
           })
       }
   }
}
export default connect(null,mapDispatchToProps)(ComA) //A发送发,实现第二个参数
1
2
3
4
5
6
7
8
9
10
11
12
13
14
15
16
17
18
19
20
21
2
3
4
5
6
7
8
9
10
11
12
13
14
15
16
17
18
19
20
21
ComB接受state- 导入
connect方法 - 利用
connect对组件进行加强 ComB属于接收方,需实现connect的第一个参数mapStateToPrps里面的第一个参数就是state- 把
state进行return才能在组件的内部回去到最新的数据 ComB是否能拿到数据,关键点是reducer- 只有
reducer里面返回新的state时,才能获取到
- 导入
ComB/index.js
import { React } from "react";
import { connect } from "react-redux";
class ComB extends React.Component {
  render() {
    console.log("ComB", this.props);
    return <div>{this.props.count}</div>; //⑦返回值,通过this.props拿到
  }
}
const mapStateToProps = (state) => {
  console.log("ComB", state);
  return state; //⑥进入B组件,返回值
};
export default connect(mapStateToProps)(ComA); //B是接收方,需实现第一个参数
1
2
3
4
5
6
7
8
9
10
11
12
13
2
3
4
5
6
7
8
9
10
11
12
13
- 数据传递流程
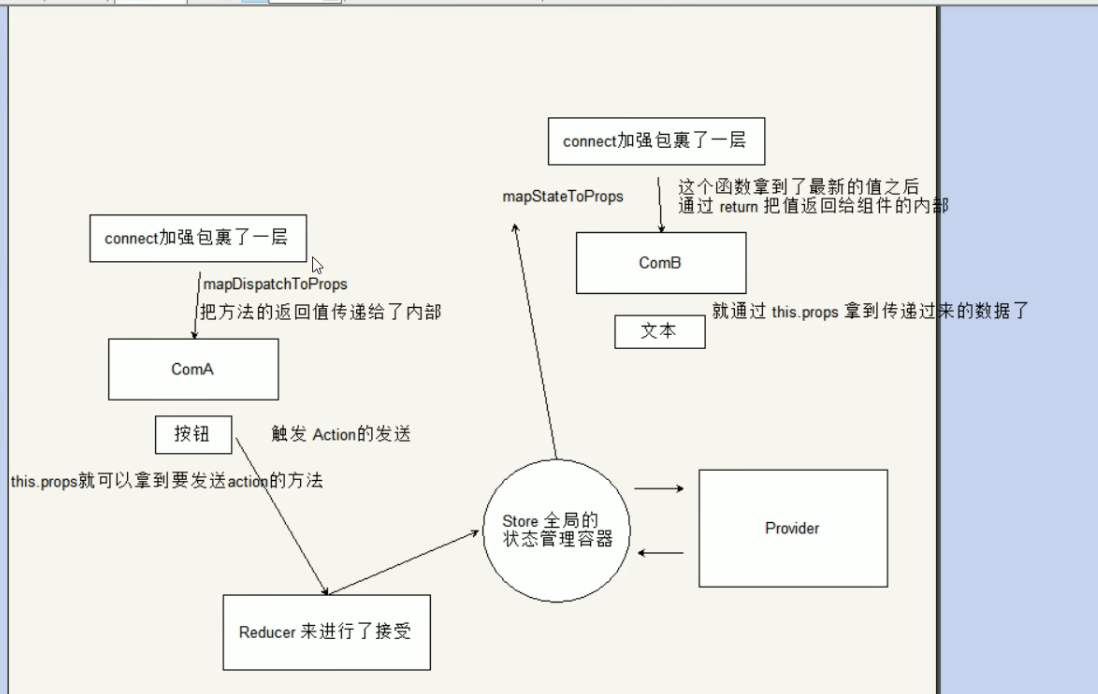
补充
connect组件被connect加强,才能使用 store 里的数据 第一个参数:那个组件需要接收参数,就写这个参数,接收方,ComB第二个参数:发送方ComA- react 触发更新:外界的
props发生变化,this.setState,propsUpdate
# 【参考】
https://www.bilibili.com/video/BV1oE411V7RW?p=1
https://www.bilibili.com/video/BV1Uv411b7eR?p=34