# 前言
HTTP 缓存常见的有两类:
- 强缓存:可以由这两个字段其中一个决定
- expires
- cache-control(优先级更高)
- 协商缓存:可以由这两对字段中的一对决定
- Last-Modified,If-Modified-Since
- Etag,If-None-Match(优先级更高)
- 推荐配置(具体解释参考👇: 参考第二篇)
- 为了防止中介缓存,建议设置:
Cache-Control: private - 建议设置适当的二级缓存 key:如果我们请求的响应是跟请求的 Cookie 相关的,建议设置:
Vary: Cookie
- 准备
- 创建文件夹 cache-study,并准备环境
npm init
- 安装 Koa、nodemon
npm i koa -D npm i nodemon -g
- 创建 index.js、index.html、static 文件夹
index.html
<!DOCTYPE html>
<html lang="en">
  <head>
    <meta charset="UTF-8" />
    <meta http-equiv="X-UA-Compatible" content="IE=edge" />
    <meta name="viewport" content="width=device-width, initial-scale=1.0" />
    <title>Document</title>
    <link rel="stylesheet" href="./static/css/index.css" />
  </head>
  <body>
    <div class="box"></div>
  </body>
</html>
2
3
4
5
6
7
8
9
10
11
12
13
static/css/index.css
.box {
  width: 500px;
  height: 300px;
  background-image: url("../image/guang.jpg");
  background-size: 100% 100%;
  color: #000;
}
2
3
4
5
6
7
static/image/test.jpg(随便准备一张图片)
index.js
const Koa = require("koa");
const fs = require("fs");
const path = require("path");
const mimes = {
  css: "text/css",
  less: "text/css",
  gif: "image/gif",
  html: "text/html",
  ico: "image/x-icon",
  jpeg: "image/jpeg",
  jpg: "image/jpeg",
  js: "text/javascript",
  json: "application/json",
  pdf: "application/pdf",
  png: "image/png",
  svg: "image/svg+xml",
  swf: "application/x-shockwave-flash",
  tiff: "image/tiff",
  txt: "text/plain",
  wav: "audio/x-wav",
  wma: "audio/x-ms-wma",
  wmv: "video/x-ms-wmv",
  xml: "text/xml",
};

// 获取文件的类型
function parseMime(url) {
  // path.extname获取路径中文件的后缀名
  let extName = path.extname(url);
  extName = extName ? extName.slice(1) : "unknown";
  return mimes[extName];
}

// 将文件转成传输所需格式
const parseStatic = (dir) => {
  return new Promise((resolve) => {
    resolve(fs.readFileSync(dir), "binary");
  });
};

const app = new Koa();

app.use(async (ctx) => {
  const url = ctx.request.url;
  if (url === "/") {
    // 访问根路径返回index.html
    ctx.set("Content-Type", "text/html");
    ctx.body = await parseStatic("./index.html");
  } else {
    const filePath = path.resolve(__dirname, `.${url}`);
    // 设置类型
    ctx.set("Content-Type", parseMime(url));
    // 设置传输
    ctx.body = await parseStatic(filePath);
  }
});

app.listen(9898, () => {
  console.log("start at port 9898");
});
2
3
4
5
6
7
8
9
10
11
12
13
14
15
16
17
18
19
20
21
22
23
24
25
26
27
28
29
30
31
32
33
34
35
36
37
38
39
40
41
42
43
44
45
46
47
48
49
50
51
52
53
54
55
56
57
58
59
60
启动页面
可在终端中输入 nodemon index,启动服务。
# 一. 强缓存
# (一)基础
定义: 在缓存数据未失效的情况下,客户端可以直接使用缓存数据,不用和数据库进行交互。
判断请求是否失效主要靠两个 HTTP Header:
- Expires:数据的缓存到期时间,下一次请求时,请求时间小于服务端返回的到期时间,直接使用缓存数据。设置的是毫秒数。
- Cache-Control:可以指定一个 max-age 字段,表示缓存的内容将在一定时间后失效。设置的是秒数。
# (二)expires
- 需设置响应头里 expires 的时间为当前时间 + 30s
app.use(async (ctx) => {
  const url = ctx.request.url;
  if (url === "/") {
    // 访问根路径返回index.html
    ctx.set("Content-Type", "text/html");
    ctx.body = await parseStatic("./index.html");
  } else {
    const filePath = path.resolve(__dirname, `.${url}`);
    // 设置类型
    ctx.set("Content-Type", parseMime(url));
    // 设置 Expires 响应头
    const time = new Date(Date.now() + 30000).toUTCString();
    ctx.set("Expires", time);
    // 设置传输
    ctx.body = await parseStatic(filePath);
  }
});
2
3
4
5
6
7
8
9
10
11
12
13
14
15
16
17
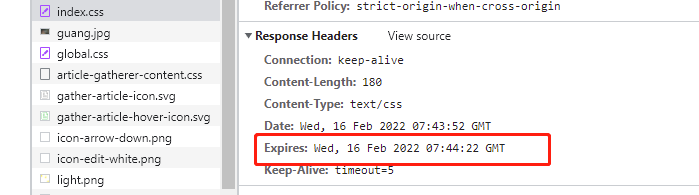
然后在前端页面刷新,我们可以看到请求的资源的响应头里多了一个 expires 的字段
并且,在 30s 内,我们刷新之后,看到请求都是走 memory,这意味着,通过 expires 设置强缓存的时效是 30s,这 30s 之内,资源都会走本地缓存,而不会重新请求

WARNING
注意点:有时候你 Nodejs 代码更新了时效时间,但是发现前端页面还是在走上一次代码的时效,这个时候,你可以把这个 Disabled cache 打钩,然后刷新一下,再取消打钩

# (三)Cache-Control
pp.use(async (ctx) => {
  const url = ctx.request.url;
  if (url === "/") {
    // 访问根路径返回index.html
    ctx.set("Content-Type", "text/html");
    ctx.body = await parseStatic("./index.html");
  } else {
    const filePath = path.resolve(__dirname, `.${url}`);
    // 设置类型
    ctx.set("Content-Type", parseMime(url));
    // 设置 Cache-Control 响应头
    ctx.set("Cache-Control", "max-age=30");
    // 设置传输
    ctx.body = await parseStatic(filePath);
  }
});
2
3
4
5
6
7
8
9
10
11
12
13
14
15
16
前端页面响应头多了 cache-control 这个字段,且 30s 内都走本地缓存,不会去请求服务端

# 二. 协商缓存
# (一)基础
- 定义:与强缓存不同的是,强缓存是在时效时间内,不走服务端,只走本地缓存;而协商缓存是要走服务端的,如果请求某个资源,去请求服务端时,发现命中缓存则返回
304,否则则返回所请求的资源。
协商缓存,顾名思义需要和服务器进行一次协商。浏览器第一次请求时,服务器会将缓存标识与数据一起返回给客户端,客户端将二者备份至缓存数据库中。再次请求数据时,客户端将备份的缓存标识发送给服务器,服务器根据缓存标识进行判断,判断成功后,返回 304 状态码,通知客户端比较成功,可以使用缓存数据。
- 判断请求主要靠下面两组 HTTP Header:
Last-Modified:一个Response Header,服务器在响应请求时,告诉浏览器资源的最后修改时间。if-Modified-Since:一个Request Header,再次请求服务器时,通过此字段通知服务器上次请求时,服务器返回的资源最后修改时间。服务器会通过收到的 If-Modified-Since 和资源的最后修改时间进行比对,判断是否使用缓存。Etag:一个Response Header,服务器返回的资源的唯一标示If-None-Match:一个Request Header,再次请求服务器时,通过此字段通知服务器客户段缓存数据的唯一标识。服务器会通过收到的If-None-Match和资源的唯一标识进行对比,判断是否使用缓存。
# (二)Last-Modified,If-Modified-Since
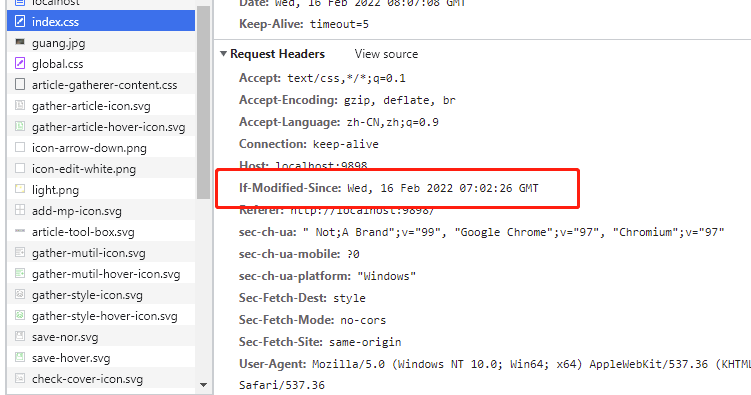
- 第一次请求资源时,服务端会把所请求的资源的最后一次修改时间当成响应头中
Last-Modified的值发到浏览器并在浏览器存起来 - 第二次请求资源时,浏览器会把刚刚存储的时间当成请求头中
If-Modified-Since的值,传到服务端,服务端拿到这个时间跟所请求的资源的最后修改时间进行比对 - 比对结果如果两个时间相同,则说明此资源没修改过,那就是命中缓存,那就返回
304,如果不相同,则说明此资源修改过了,则没命中缓存,则返回修改过后的新资源
// 获取文件信息
const getFileStat = (path) => {
  return new Promise((resolve) => {
    fs.stat(path, (_, stat) => {
      resolve(stat);
    });
  });
};

app.use(async (ctx) => {
  const url = ctx.request.url;
  if (url === "/") {
    // 访问根路径返回index.html
    ctx.set("Content-Type", "text/html");
    ctx.body = await parseStatic("./index.html");
  } else {
    const filePath = path.resolve(__dirname, `.${url}`);
    const ifModifiedSince = ctx.request.header["if-modified-since"];
    const fileStat = await getFileStat(filePath);
    console.log(new Date(fileStat.mtime).getTime());
    ctx.set("Cache-Control", "no-cache");
    ctx.set("Content-Type", parseMime(url));
    // 比对时间,mtime为文件最后修改时间
    if (ifModifiedSince === fileStat.mtime.toGMTString()) {
      ctx.status = 304;
    } else {
      ctx.set("Last-Modified", fileStat.mtime.toGMTString());
      ctx.body = await parseStatic(filePath);
    }
  }
});
2
3
4
5
6
7
8
9
10
11
12
13
14
15
16
17
18
19
20
21
22
23
24
25
26
27
28
29
30
31
第一次请求时,响应头中:

第二次请求时,请求头中:
由于资源并没修改,则命中缓存,返回 304:

此时我们修改一下 index.css
然后我们刷新一下页面,index.css 变了,所以会没命中缓存,返回 200 和新资源,而 guang.jpg 并没有修改,则命中缓存返回 304:

# (三)Etag,If-None-Match
Etag,If-None-Match 跟 Last-Modified,If-Modified-Since 大体一样,区别在于:
- 后者是对比资源最后一次修改时间,来确定资源是否修改了
- 前者是对比资源内容,来确定资源是否修改
- 那我们要怎么比对资源内容呢?我们只需要读取资源内容,转成
hash值,前后进行比对就行了!!
const crypto = require("crypto");

app.use(async (ctx) => {
  const url = ctx.request.url;
  if (url === "/") {
    // 访问根路径返回index.html
    ctx.set("Content-Type", "text/html");
    ctx.body = await parseStatic("./index.html");
  } else {
    const filePath = path.resolve(__dirname, `.${url}`);
    const fileBuffer = await parseStatic(filePath);
    const ifNoneMatch = ctx.request.header["if-none-match"];
    // 生产内容hash值
    const hash = crypto.createHash("md5");
    hash.update(fileBuffer);
    const etag = `"${hash.digest("hex")}"`;
    ctx.set("Cache-Control", "no-cache");
    ctx.set("Content-Type", parseMime(url));
    // 对比hash值
    if (ifNoneMatch === etag) {
      ctx.status = 304;
    } else {
      ctx.set("etag", etag);
      ctx.body = fileBuffer;
    }
  }
});
2
3
4
5
6
7
8
9
10
11
12
13
14
15
16
17
18
19
20
21
22
23
24
25
26
27
验证方式跟刚刚Last-Modified,If-Modified-Since的一样。